Übersetzungshinweis
Leider war es uns noch nicht möglich, diese Seite für Sie auf Deutsch zu übersetzen. Wir zeigen daher stattdessen die englischsprachige Version der Seite und bitten um Verständnis.
Seating#
pretix Hosted pretix Enterprise
This article tells you how to use the seating feature of pretix. This feature allows you to create seating plans in order to then sell tickets for individual seats. This is useful if, for example, your event is taking place at a theater, a stadium, or a dining hall. When a customer visits your shop, they will be able to look at the seating plan and select their preferred seat.
You can create seats and organize them into numbered rows and separate zones. You can use zones to represent a complex venue layout, for instance, one including orchestra, mezzanine, box seats, and a floor. A clean organization of those different spaces into zones on your seating plan can help your customers find their preferred seat while placing an order.
You can include zone, row, and seat number on the ticket and thus help your customers find their seat at the venue.
The usefulness of the seating feature is not limited to seats. You can also use it to sell or assign, for instance, tables in a reading room or spots in a parking lot. Seating plans can represent any space with a fixed layout and a limited number of usable spots.
The seating feature is available on pretix Hosted and on pretix Enterprise. It is not available on pretix Community.
Prerequisites#
Many aspects of seating are handled on the event level, so you need to create an event first.
General usage#
If you want to sell tickets based on individual seats for your event, you need to take the following steps:
- Enabling the plugin
- Using the seating plan editor to create a layout which the editor will then validate
- Assigning the plan to your organizer account in your organizer account
- Creating products for seating
- Assigning your seating plan to your event or a date in your event series
- Deciding whether or not you want customers to select their own seats
The following sections will guide you through those steps in detail.
Enabling the plugin#
In order to enable the "Seating" plugin for your event, navigate to NavigationspfadYour organizer dann Settings dann Plugins. Open the Features tab. This page includes the Seating plugin as a "Top recommendation" at the top. Click the Enable button next to it.
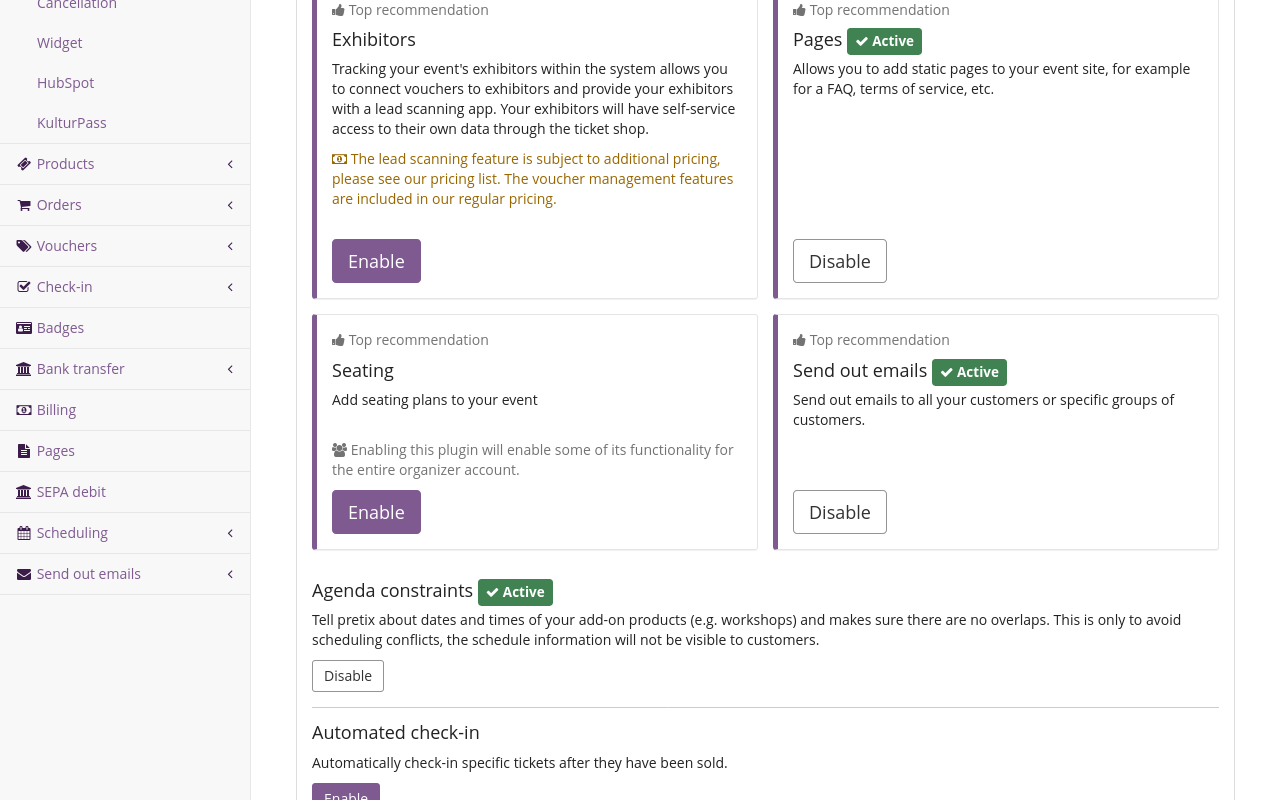
In the list labeled "Events with active plugin", check the events for which you want to use seating plans. Now that you have enabled the seating plugin, all settings associated with seating are available for your organizer.
Creating a layout#
The central component of any seating plan is the JSON file defining the layout. In order to create a new layout, open the editor at https://seats.pretix.eu/. You can use this editor without being logged in to a pretix account.
Alternatively, navigate to NavigationspfadYour organizer dann Seating plans and click the Create a new seating plan button. On the next page, click the Go to editor button. This also takes you to https://seats.pretix.eu/.
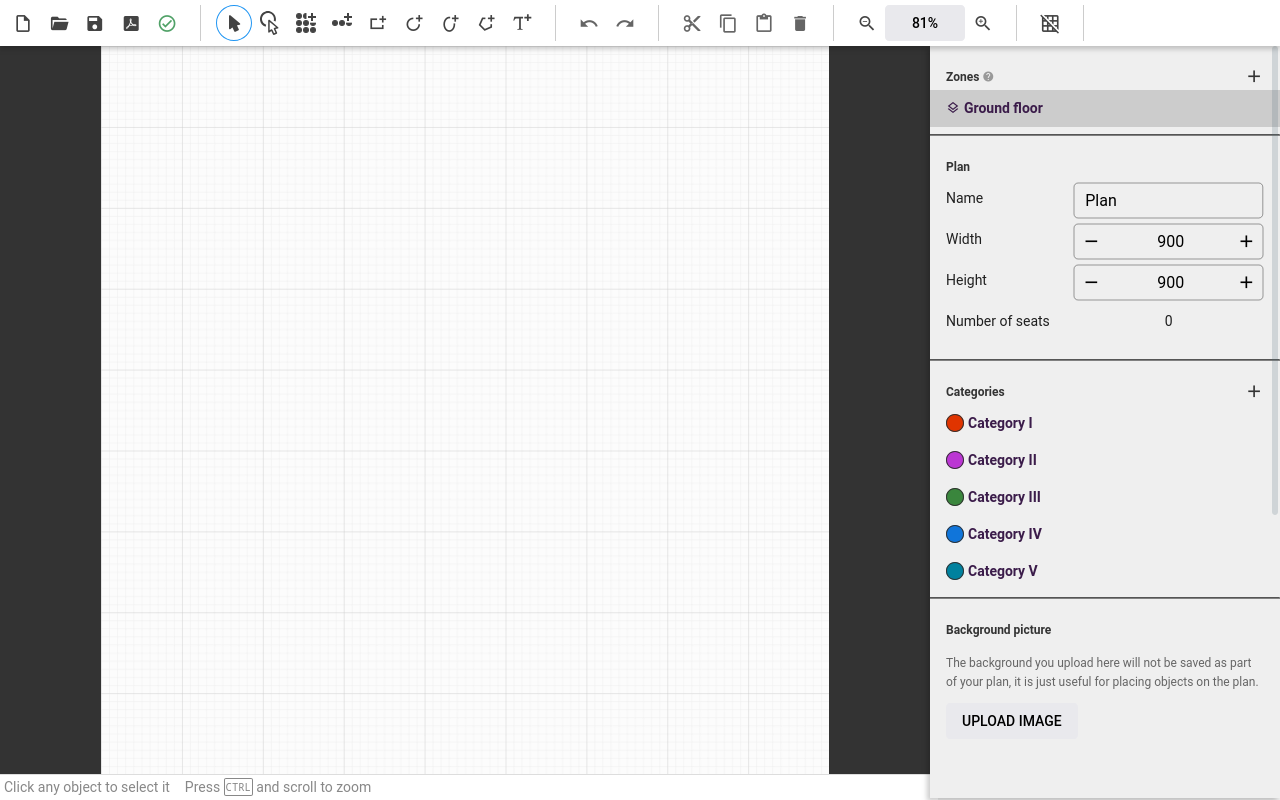
If you have an image file containing a plan of your venue, that image can be helpful while creating the layout. If you want to use such an image as guidance during layout creation, click the UPLOAD IMAGE button and select the file. The layout editor will not save the image you upload here as part of your layout. It merely serves as a useful template for placing seats and other objects on the layout.
If you have uploaded an image, then it makes sense to adapt the width and height to the dimensions of that image. If not, you can create seats and other objects first, and adapt width and height of the layout to fit those elements comfortably.
If your venue has more than one floor or seating block, then you should create a corresponding number of zones in the layout. If your venue has seat and row numbers that occur more than once, and you want the layout to reflect those exact numbers, then you have to place the seats in separate zones. In order to create a new zone, click the button next to "Zones" in the sidebar and enter a name.
pretix maps products to seats depending on the seat category. You need one seat category for every product you want to sell. If you want to sell only one product for all seats on your plan, then you only need one seat category.
Create a seat category by clicking the button next to the headline "Categories" in the sidebar. Enter a name and select a color for the seat category. You can remove a seat category by clicking the button next to it. Change the name and color by clicking the button.
Hinweis
If you are using a Mac computer, you can use the ⌘ key aka Command key in place of the Ctrl key.
The Ctrl key also works.
In order to zoom in and out of the layout, hold the Ctrl key and move your mouse wheel.
Alternatively, you can use the buttons
and
in the top bar.
In order to move the view around, hold the Ctrl key, click the layout, hold the mouse key, and move your mouse.
In order to select existing elements, click the "select rows or shapes" button in the top bar. If you want to select only a single seat, click the "select seats" button instead. Click the element you want to select. You can also select a single seat by clicking the "select rows or shapes" button and then double-clicking the seat.
Hinweis
The "Optimizer hint" setting is only relevant for advanced use cases. See Optimizing seat selection by customers for more information.
Hinweis
Ideally, the radius of seats in your plan should not deviate too far from the default value of 10. Creating much smaller seats may result in them being difficult to select. Creating much larger seats may result in text labels being too difficult to read.
If you want to select multiple elements, hold the Shift key while clicking them.
Alternatively, hold the left mouse button and move the mouse to draw a selection rectangle around them.
Use the sidebar on the right to edit the properties of all elements in your selection.
In order to move selected elements, drag and drop them with your mouse.
If you want to keep the movement aligned to the grid, hold the Shift button while you are moving them with your mouse.
Alternatively, you can use the arrow keys.
Hold the Shift key for larger movements and the Alt key for smaller movements while moving elements with the arrow keys.
If you want to move selected elements to a different zone, click the
"cut" button.
Alternatively, press Ctrl+X.
Select the zone to which you want to move the elements.
Click the
"paste" button.
Alternatively, press Ctrl+V.
In order to save the layout, click the "save" button in the top left. This opens a dialog allowing you to save the resulting JSON file on your computer. If your plan contains validation errors, then clicking it will not save the file, but open an error notification instead. See Validating the layout for information on how to handle those errors.
Validating the layout#
The editor will validate your layout by checking for duplicate elements that could stop it from working properly. If validation succeeds, then the "Validation" symbol in the top bar will be a green checkmark . If validation fails, then the symbol will be a red exclamation mark instead. If you click the "Save" button while validation is failing, then your browser will display a warning popup. You can still download the faulty plan by clicking the OK button in that warning popup.
One possible cause for a failed validation is the occurrence of duplicate combinations of zone, row number, and seat numbers. Each unique combination may only occur once. Another possible cause are duplicate seat IDs.
Seat IDs can be one of three things:
- a UUID consisting of letters, numbers, and dashes
- a string containing the zone, row number, and seat number, joined with dashes
- a custom string defined by you
The editor will assign seats the first option (UUID) during creation if you do not change any of the defaults (row or seat number). If you change seat or row number, or if you use the "Reversed" toggle, the editor will assign the second option (zone, row number, and seat number, joined with dashes) as the seat ID. You can edit the seat ID by selecting a single seat and editing the string in the "Seat ID" field.
Copying rows creates duplicate seat IDs as well as combination of zone, row number, and seat number. Change the row number of the row you copied to a number that is not yet in use on the plan. Then, activate the "Reversed" toggle and deactivate it again. This refreshes seat IDs so that there will be no more duplicates in that row.
Hinweis
Activating or deactivating the "Reversed" toggle on a row replaces all seat IDs in that row with a string containing the zone, row number, and seat number, joined with dashes. This is also true for any custom seat IDs that you entered manually.
In order to save the layout, click the "Save plan" button in the top left. This opens a dialog allowing you to save the resulting JSON file on your computer.
Adding a seating plan to your organizer account#
Seating plans are handled on the organizer level. This allows you to use seating plans for multiple events hosted by the same organizer.
Once you have the layout of your seating plan in the form of a JSON file, you need to create a corresponding entry for the seating plan in your organizer account. In order to do so, navigate to NavigationspfadYour organizer dann Seating plans and click the Create a new seating plan button.
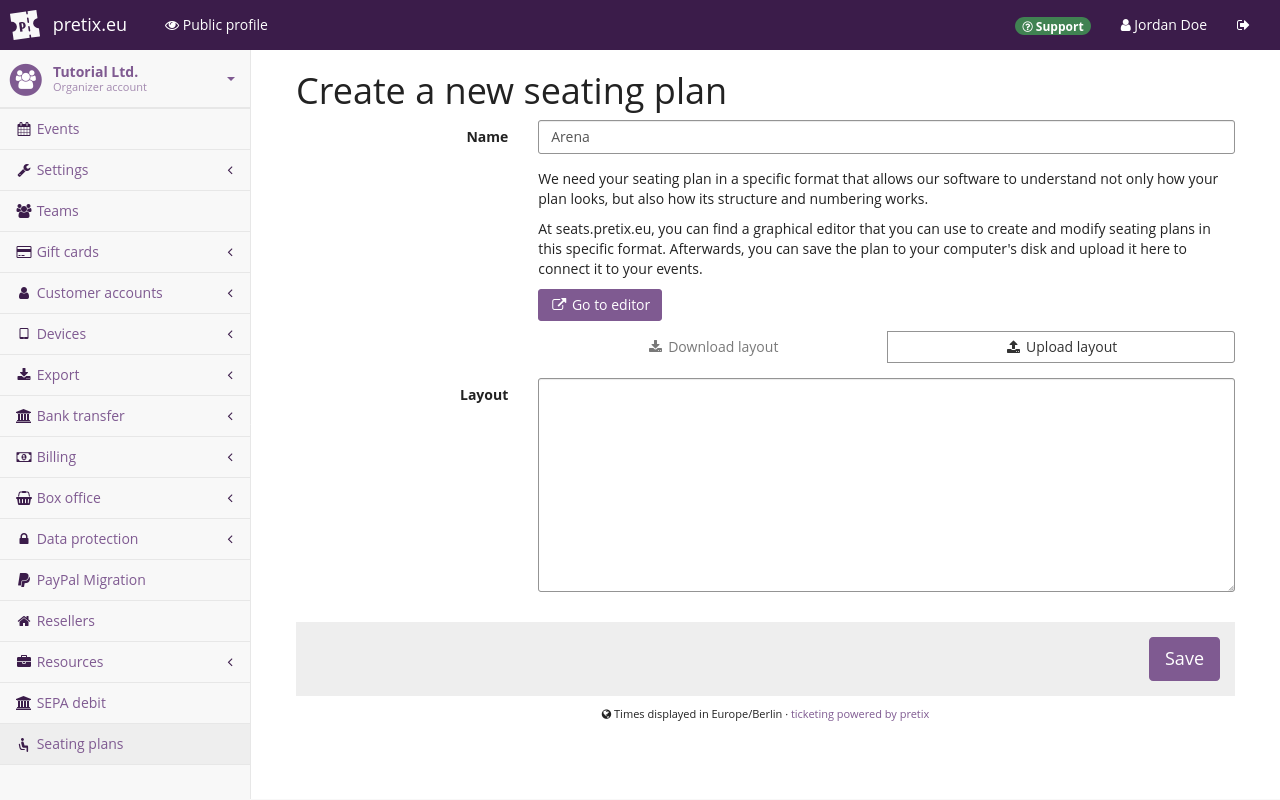
On the next page, click the Upload layout button. Select the JSON file of the seating plan you want to use, for example the one you created and downloaded in the previous step. This fills the "Layout" field with the contents of the file.
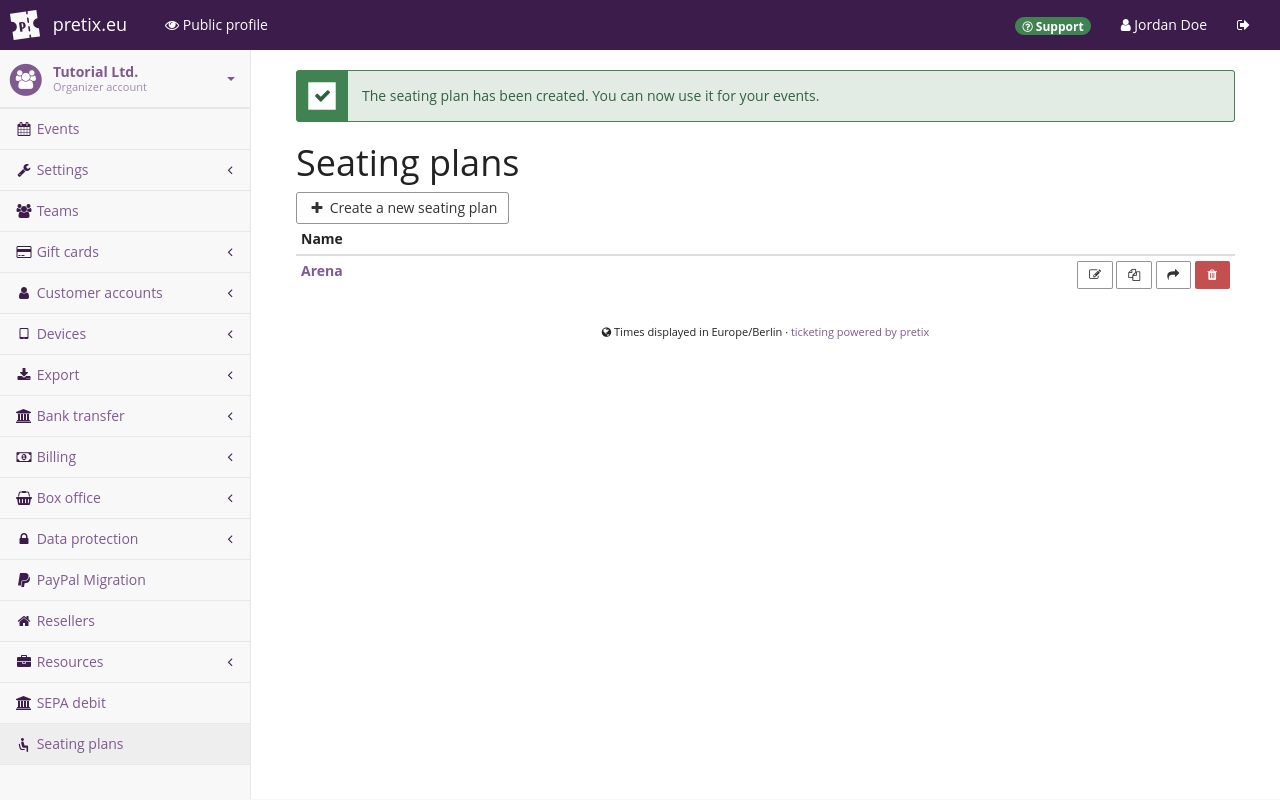
Enter a name for the seating plan in the "Name" field and click the Save button. You will land on a page titled "Seating plans", displaying a button for creating another new seating plan, and a list including the plan you created.
Creating products for seating#
Selling products via a seating plan has implications for the configuration of products in your shop. For general information on creating products, refer to our guide on products.
You can only assign a single product to a seat category. If you want to offer more than one type of product per seat, create a product with multiple variations. Assign that product to the corresponding seat category.
Create one quota for each seat category you offer in your seating plan. Set the "total capacity" of the quota to the number of seats in the seat category. For instance, if your seating plan has 48 seats in the seat category "Box seats", create a quota with a total capacity of 48. Add the product that you assigned to the "Box seats" seat category to that quota.
Both the number of seats on the plan and the total capacity of the quota limit the number of possible purchases. If the quota runs out, then customers will not be able to select a seat in the corresponding seat category. If you sell all seats in the seat category, then customers will also not be able to buy a ticket for that seat category.
The "waiting list" feature only works as expected if the total capacity of the quota and the number of seats in the corresponding seat category are equal.
You can offer both seating products and other products in your shop. Your shop will display the seating plan at the top, and the list of other products available for purchase below. This is useful if, for instance, you are offering tickets for a standing area at your venue. It is also useful if you are offering any type of non-admission product such as catering or merchandise.
Assigning a seating plan to a single event#
In order to assign a seating plan to an event, navigate to NavigationspfadYour event dann Settings dann Seating plans. Click the field labeled "Seating plan". Select the seating plan from the list.
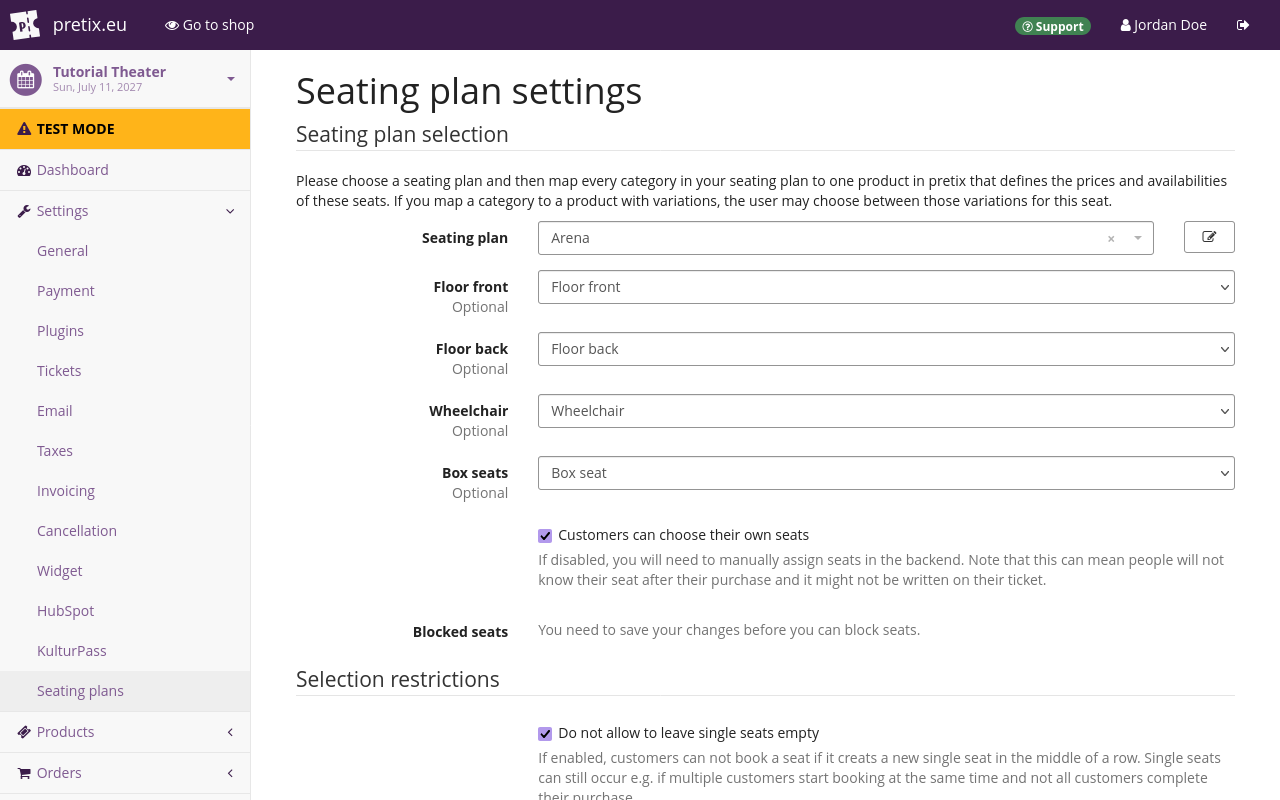
Assign products to the seating categories. All products that you assign to seating categories are available through the seating plan displayed at the top of your shop page. They do not appear in the list below. Customers will only be able to select them through the seating plan. The shop will list products that you do not assign to seating categories below the seating plan.
Once you are happy with your choices, click the Save button.
Assigning a seating plan to a date in an event series#
If you are using seating plans for your event series, you do not have to use the same seating plan for the entire series. You can assign seating plans for each date individually. In order to do so, navigate to NavigationspfadYour event dann Dates. Create or edit the dates to which you want to assign your seating plan.
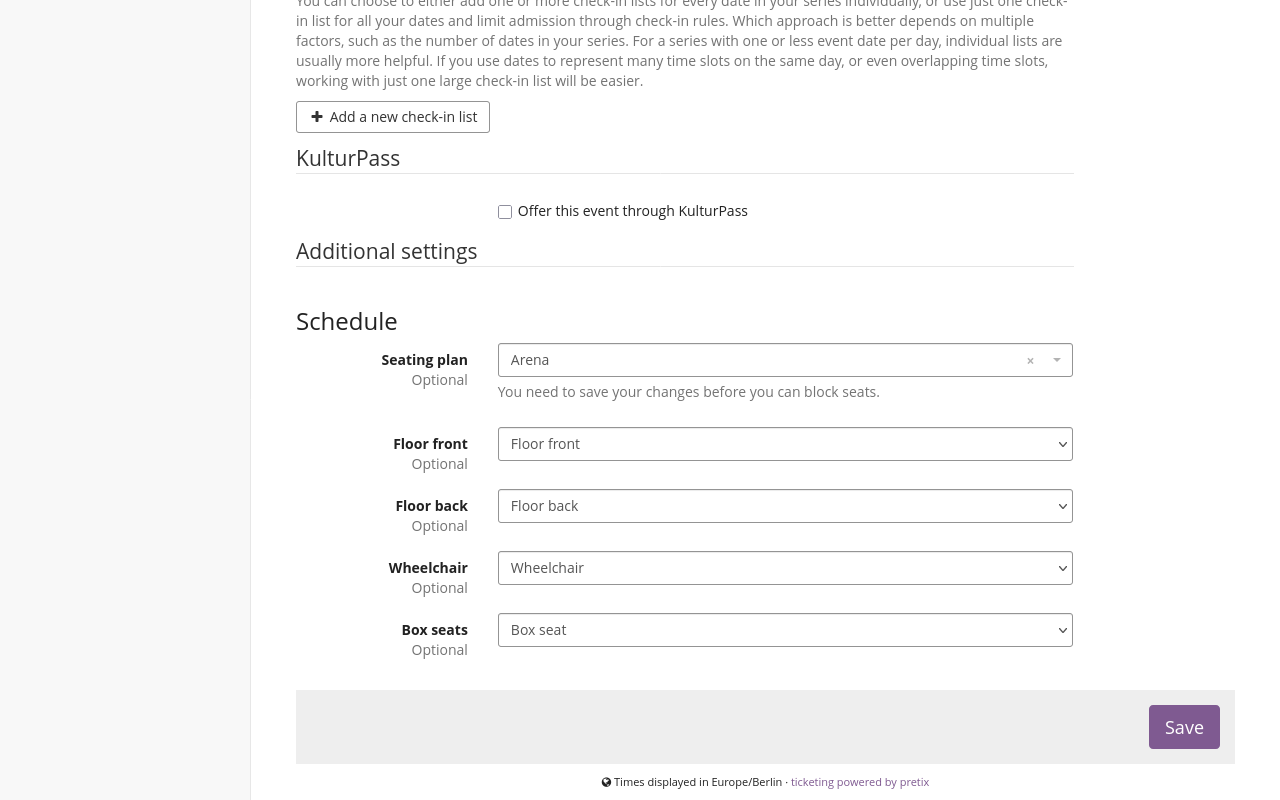
Scroll to the "Additional settings" subheading. Click the field labeled "Seating plan". Select the seating plan from the list.
Assign products to the seating categories.
Customers visiting your online shop will first select their preferred date from the calendar or list. Once they have selected a date, they will then select their preferred products from the seating plan and list.
All products that you assign to seating categories are available through the seating plan displayed at the top of your shop page. They do not appear in the list below. Customers will only be able to select them through the seating plan. The shop will list products that you do not assign to seating categories below the seating plan.
Once you are happy with your choices, click the Save button.
Letting customers select their own seats#
In order to configure the behavior of the seating plan for your singular event or event series, navigate to NavigationspfadYour event dann Settings dann Seating plans. If you want your customers to be able to select their own seats, check the box next to "Customers can choose their own seats".
If you want to assign seats to customers, uncheck the box next to "Customers can choose their own seats". You will need to manually assign seats to customers before the event. You should take care of this manual assignment before issuing tickets to your customers. Otherwise, pretix will not be able to include the seat information on the ticket.
Click the Save button.
Advanced usage#
The following sections describe use cases that go beyond the basic setup process for seating plans:
- changing a seating plan that is already in use
- blocking seats
- restricting availability
- optimizing seat selection
- requiring a certain distance between two separate bookings
The following sections will explain those use cases in detail.
Making changes to a seating plan that is already in use#
As soon as you have assigned a seating plan to an event or date, it becomes impossible to change that seating plan under the same name. But there are two methods for still making changes to the plan.
- Removing the selection of the plan, editing it, and selecting it for the event or date again
- Migrating your existing plan to a new plan
The first method only works if your seating plan is only assigned to a single event or date, and if you have not sold any products for the seats on it yet. In order to remove the selection of your seating plan for a single event, navigate to NavigationspfadYour event dann Settings dann Seating plans. In order to do the same for a date in an event series, navigate to NavigationspfadYour event dann Dates and select the date in question. The process is the same from here on out.
Delete your selection from the field labeled "Seating plan" and save your changes. This makes it possible to edit the seating plan and assign it to this event or date once more. You will have to map categories to products again.
The second method uses the migration feature. You should use this if you have assigned your seating plan to multiple events or dates, or if you have already sold products for the seats on it. Even if you are only making a small change, you still need to migrate to a new plan.
Edit the layout as needed. For every seat in your previous layout that you have already sold or created a voucher for, your new layout must contain a seat with the same seat ID. Save the layout and create a new entry for the seating plan in your organizer account.
In order to migrate from the previous seating plan to the new, navigate to NavigationspfadYour organizer dann Seating plans. Search for the seating plan from which you want to migrate in the list. Click the "Migrate to new plan" button next to it.
On the next page, select all events or dates for which you want to migrate the seating plan. Under "New seating plan", select the plan to which you want to migrate. Click the Save button.
pretix will check whether all seats that you already sold are present in the new plan. It will also check whether all seats that are in use in a voucher are present. The identifying factor is the seat ID. If the new plan fails to fulfill these two requirements, then the migration will fail. The page will display an error message.
If the new plan fulfills both requirements, then the migration will be successful.
Blocking seats#
You can disable sales for a certain selection of seats. In order to do so for a single event, navigate to NavigationspfadYour event dann Settings dann Seating plans. In order to do the same for a date in an event series, navigate to NavigationspfadYour event dann Dates and select the date in question. The process is the same from here on out.
Click the Change blocked seats button. This takes you to a page titled "Blocked seats".
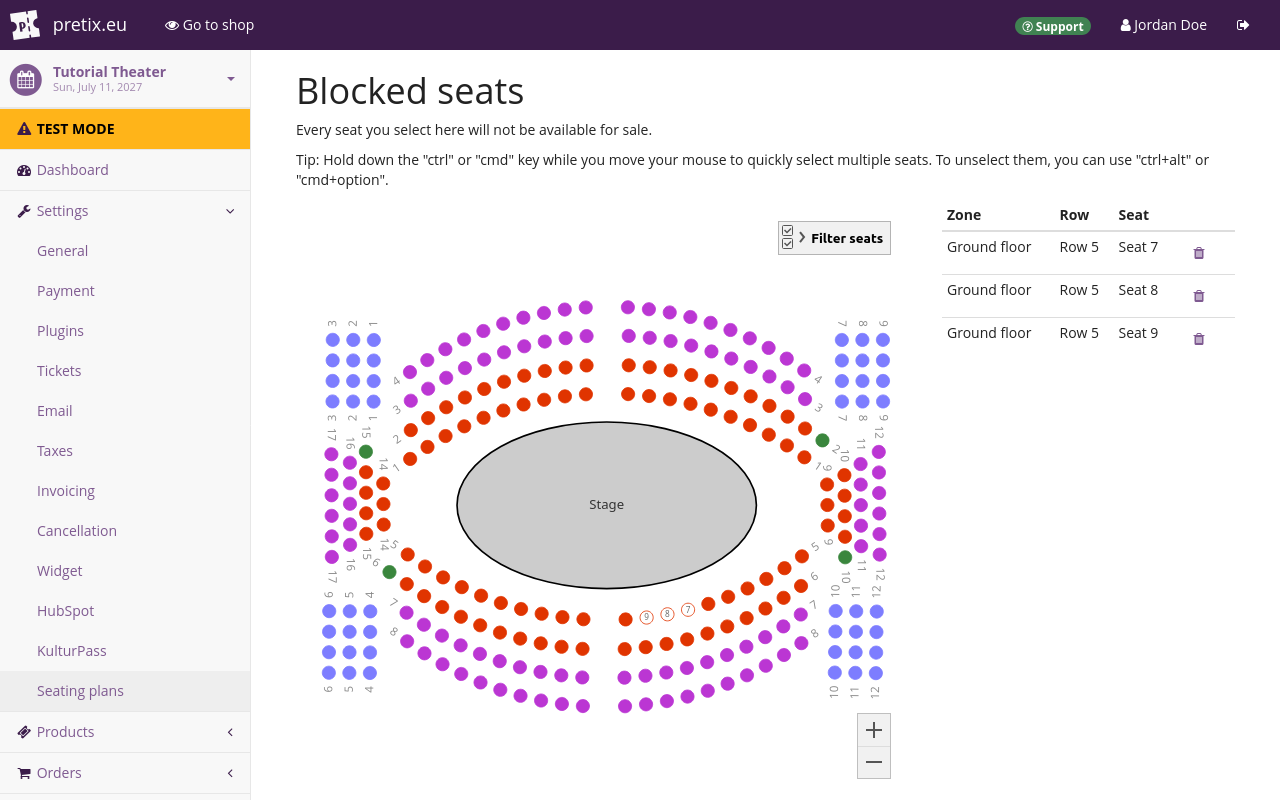
Hinweis
If you are using a Mac computer, you can use the ⌘ key aka Command key in place of the Ctrl key.
The Ctrl key also works.
Click the seats on your seating plan that you want to block from sale.
If you want to select multiple seats, hold the Ctrl key and the left mouse button to draw a rectangle around those seats.
If you want blocked seats to be available again, click them again.
If you want to make multiple seats available again, hold the Ctrl and Alt keys and the left mouse button to draw a rectangle around those seats.
Once you are happy with your choices, click the Save button.
Restricting availability#
If you want to make a selection of seats only available to a specific group of people, then you can use one of two methods:
- Configuring a product for restricted audience and assigning the seats to a corresponding category. You should generally use this method because it is more flexible.
- Blocking seats and allowing a certain sales channel to bypass the block. This method is useful if you want to be able to still sell blocked seats manually. It is also useful if you want to entrust this decision to the personell operating a specific sales channel, for example, the POS at your event or a reseller.
For the first method, create a seat category. Assign the seats you want to reserve for the restricted audience to it. Create a product that you set up for a restricted audience with one of the methods described in Products/Restricted audience.
Assign that product to the seat category as described in Assigning a seating plan to a single event or Assigning a seating plan to a date in an event series.
For the second method, block the seats for which you want to restrict availability as described under Blocking seats. Then, navigate to NavigationspfadYour event dann Settings dann Seating plans. Under "Allow to buy blocked seats on these channels", select the sales channel through which you want those blocked seats to still be available.
Optimizing seat selection by customers#
If customers are completely free in selecting their seat while placing an order, then this may have undesirable outcomes. For instance, customer orders may leave single seats empty, which are difficult to sell to other customers. This section tells you how to prevent bookings from leaving single seats empty and how to enforce starting sales from a certain seat in a row.
If you want to prevent bookings from leaving single seats empty, navigate to NavigationspfadYour event dann Settings dann Seating plans. Under "Selection restrictions", check the box next to "Do not allow to leave single seats empty". Click the Save button.
You can predetermine the order in which customers can book seats in a row. In order to do so, edit your layout. If you want customers to be able to book seats starting at one end of the row, select the seat on that end of the row. Click the "Optimizer hint" drop-down menu. The appropriate selection depends on the seat number and on whether or not the row is reversed.
- If the seat has the lowest number in the row and the row is not reversed, select
>. - If the seat has the highest number in the row and the row is not reversed, select
<. - If the seat has the lowest number in the row and the row is reversed, select
<. - If the seat has the highest number in the row and the row is reversed, select
>.
If you want customers to be able to book seats starting in the middle of the row, select the seat in the middle of the row.
Click the "Optimizer hint" drop-down menu and select <>.
Save your plan and assign it to your event as described above. Navigate to NavigationspfadYour event dann Settings dann Seating plans. Under "Selection restrictions", check the box next to "Do not allow to buy seats if there is a better choice of seats in the same row". Click the Save button.
Requiring distance between bookings#
You can require a certain spatial distance between separate bookings. This can be useful if, for instance, you want to lower the risk of infection for your event's attendees during a pandemic.
This feature relies on the distance from one seat's center point to the next seat's center point in your layout. It does not use the physical distance between seats at your venue. Implementing a distance requirement in your pretix seating plan cannot be a guarantee that you are complying with regulation.
We recommend taking measurements at your venue to determine the distance between seats. Then, edit your layout in such a way that the distance between seats in the plan reflects the distance between seats at your venue. In other words, your plan needs to be true to scale.
Assume, for example, that you want to leave one seat free between distinct bookings. In order to determine the distance between seats in your layout, edit it. Select one of your rows and read the "Seat spacing" field. This number represents the average distance from one seat in that row to the next.
You can also take a look at the background grid.
If the grid is not visible, click the
"Toggle grid" button in the top bar.
One square on the grid corresponds to a distance of 10 in the layout's scale.
Navigate to NavigationspfadYour event dann
Settings dann Seating plans.
In the field labeled "Required distance between distinct bookings", enter a number that is larger than the distance between two adjacent seats, but smaller than the distance between one seat and the seat after the next one.
For instance, if the seats on your layout have a distance of 25, you could enter the number 30.
If you want to enforce more than one empty seat between bookings, enter a larger number. If you want to enforce an exact spatial distance, the number depends on the physical measurements at your venue and your layout's scale.
If you want to enforce this distance only within the same row, check the box next to "Only respect distance within the same row". If you leave that box unchecked, the restriction will also apply to seats between different rows.
Click the Save button.
Further information#
pretix-Tutorial: Saalplan-Editor on YouTube (German)