Taxes#
Most legislations require you to pay taxes on any sales you make using pretix. pretix gives you the tools you need to calculate the appropriate tax for each sale.
Taxes are configured on the event level. During event creation, pretix prompts you to create one simple tax rule. This may already be enough for the most straightforward use cases. This article tells you how to create additional tax rules, how to configure complex custom tax rules, and how to assign them to products.
This article does not tell you what taxes are appropriate for your individual situation. This depends on your local legislation, the type of your business, and a number of other factors. The pretix documentation does not contain any information on the appropriate tax rates for your situation. Speak to a professional tax consultant before setting tax rates in your shop.
Warning
The pretix Documentation is not legal or financial advice. Please consult a tax advisor before setting the tax rules for your shop. We do not assume any liability for the correct handling of taxes in your ticket shop.
Prerequisites#
Taxes are handled on the event level, so you have to create an event first.
General usage#
pretix allows you to set up a tax rule for each tax rate that is relevant for your situation. Then, you assign that tax rule to each individual product.
Tax rules are configured for each event individually. There is no default set of tax rules. You can only assign a tax rule to a product after you have created the tax rule. This is true even for a tax rate of 0%. If you are selling products with a 0% tax rate (such as gift cards), you still need to create a 0% tax rule first.
When it comes to tax rules for free products, the only material difference is the tax rate printed on the invoice. Create and assign the tax rule that you want to see on the invoice. pretix does not create invoices for orders that only contain free products.
Creating tax rules#
In order to create a new tax rule, navigate to navigation pathYour event then Settings then Taxes. This page displays a list of all tax rules that you have created for the event. To create a new tax rule, click the Create a new tax rule button.
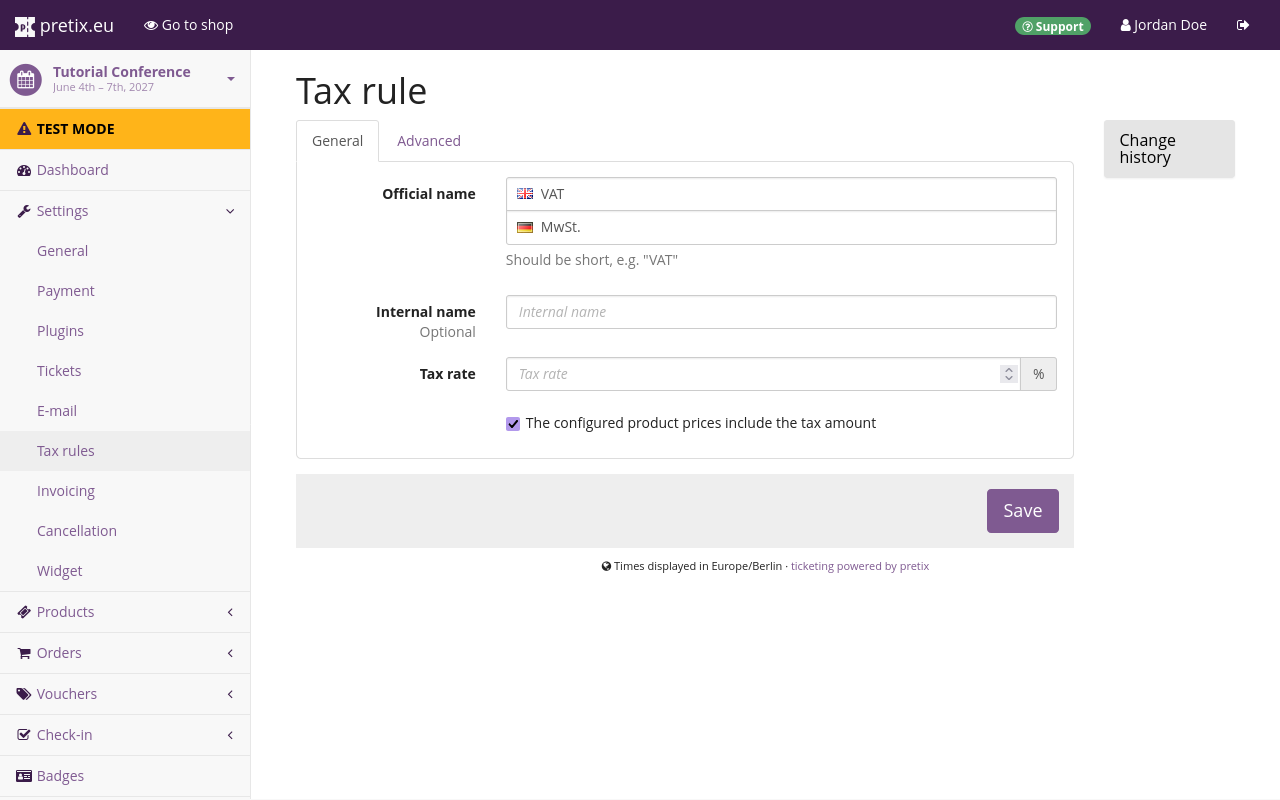
This takes you to a dialog for creating the new tax rule. On the "General" tab, choose an "Official name" that your shop will display to customers. Provide a translation for each language you are using.
Optionally, you can choose an "Internal name" that the pretix backend will display to you and your team members.
Under "Tax rate", choose a rate in percent. For example, if you sell products with the regular value-added tax rate in Germany, set the "Tax rate" to 19%.
The box next to "The configured product prices include the tax amount" determines whether to handle the price of a product with this tax rule as its net price (before tax) or its gross price (after tax).
By default, this setting is active, so pretix handles all product prices with this tax rule as gross prices (the price includes tax). This means that a product with a listed price of €10.00 and a tax rate of 19% has a net price of €8.40, €1.60 worth of value-added tax, and a total gross price of €10.00.
If you uncheck the box, pretix handles all product prices with this tax rule as net prices (pretix adds tax on top of the listed price). A product with a price of €10.00 and a 19% tax rule will have €1.90 worth of taxes added on top of the net price, leading to a gross price of €11.90. This setting applies to all products that use this specific tax rule. It does not apply to all products in your shop.
Click the Save button to confirm your choices.
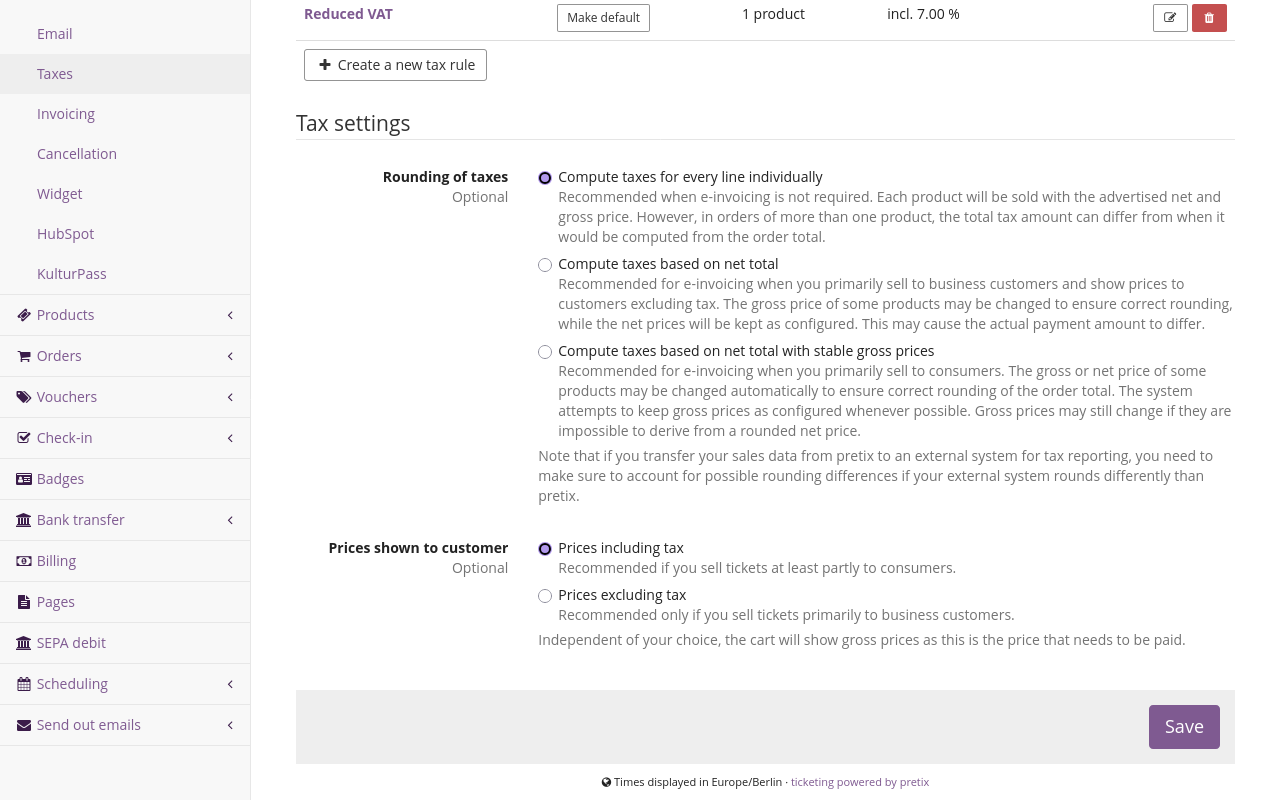
The setting "The configured product prices include the tax amount" affects the way you configure product prices within pretix. It does not affect the way prices are displayed to customers in your shop. If you want to display prices without tax in your shop, navigate to navigation pathYour event then Settings then Tax. Change the setting "Prices shown to customer" to "Prices excluding tax" and click the Save button. This setting affects all products regardless of tax rule.
Custom tax rules#
Note
Using custom tax rules is mutually exclusive with the EU reverse charge option. If you have defined one or more custom tax rules, then the EU reverse charge taxation rule will not apply, even if the box next to "Use EU reverse charge taxation rules" is checked.
pretix allows you to set "custom rules" if you have special requirements for the conditions in which to charge or not to charge value-added tax (VAT) on top of your sales. These "custom rules" are subordinate to a tax rule and optional.
If you want to use custom rules specific to businesses with VAT IDs, you have to ask your customers for their VAT ID. Navigate to navigation pathYour event then Settings then Invoicing. Switch to the Address form tab and ensure that the boxes next to "Ask for invoice address" and "Ask for VAT ID" are checked. Click the Save button to confirm.
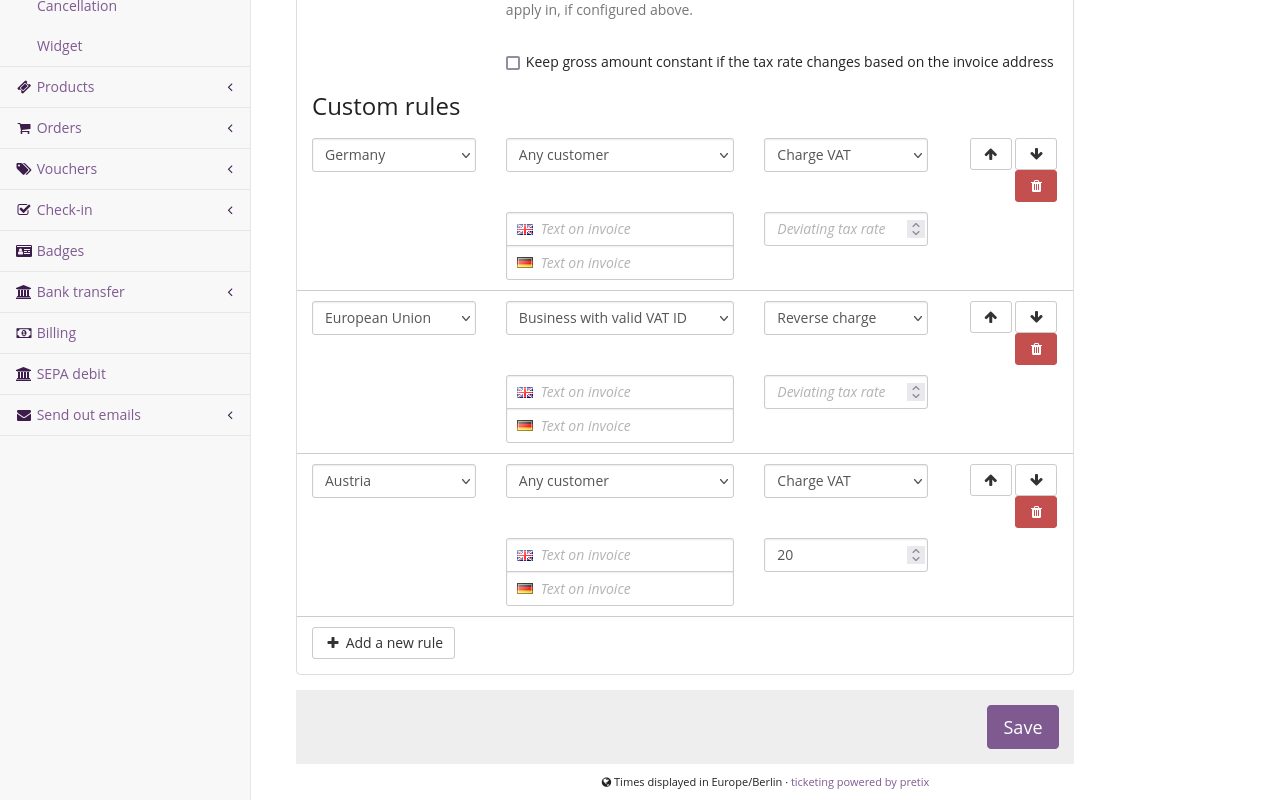
In order to set custom tax rules, navigate to navigation pathYour event then Settings then Tax rules. Click the tax rule for which you want to set custom rules, switch to the Advanced tab and click the Add a new rule button.
Under "Condition", in the first dropdown menu, select the country or territory where the custom rule will apply or select "Any country". In the second menu, select the type of customer (individual, business, or business with valid VAT ID) or select "Any customer".
Under "Calculation", choose how pretix should calculate tax under the specified conditions (country and customer). If you want to charge a tax rate specific to the conditions you defined, select "Charge VAT" and enter the tax rate in the input field below. If you want to implement a reverse charge rule for the condition, select "Reverse charge" and leave the field below empty.
The other options allow you to charge no tax, to require manual approval, or to forbid sales altogether for the condition you defined. You may leave the input field below empty in those cases.
Under "Reason", you can select a legal reason for the tax rule you put into place. If the drop-down menu does not offer your specific reason, select a more general option. You can use the "Text on invoice" fields to add an explanation for the taxes charged to your customers' invoices.
When a customer places an order, pretix will check the custom rules from top to bottom. The first rule matching the order decides if and how pretix will charge VAT. You can move the rules up or down the priority list using the arrow buttons and .
For illustrative purposes, assume that a company in Germany is hosting an event which is eligible for EU reverse charge. Such a company might first create a rule for "Germany", applying to "Any customer" the calculation "Charge VAT". The tax rate would be 19.00% and the reason would be "Default tax code". The company might then create a rule for "European Union", applying to "Business with valid VAT ID" the calculation "Reverse charge" with the tax rate field left empty and the reason set to "Reverse charge".
It might then create a rule for Austria, applying to "Any customer" the calculation "Charge VAT" with the tax rate set to the VAT rate of the country in question. It might then create the same rule for every single member state in the EU from Belgium to Sweden, always setting the appropriate deviating tax rate. Finally, the company might create a rule for "Any country", applying to "Any customer" the calculation "Charge VAT".
In this example, if a company located in Austria with a valid VAT ID places an order, this matches both the second and the third rule. However, since pretix always checks custom rules top to bottom and only applies the first matching rule, the software will only apply the second rule from our list (European Union → "Business with valid VAT ID" → "Reverse charge") to the transaction.
The order in which the hypothetical company arranged the rules here also ensures that no business from an EU country outside of Germany will be charged VAT on their transaction, as long as they provide a valid VAT ID while placing their order.
Note
The example case described above is for illustrating the use of the software only. It does not constitute legal advice.
EU reverse charge#
Warning
Reverse charge rules are not applicable to most events handled with pretix. We therefore strongly recommend not to enable this feature if you do not have a specific reason to do so. According to article 52 of the VAT directive (page 17), the place of supply is always the location of your event. Therefore, the applicable tax law will always be that of the country where the event is held, regardless of the location of the customer.
Note
The EU reverse charge feature is deprecated. A future update of pretix will remove this feature. Avoid using EU reverse charge if possible and define custom tax rules instead. That way, you can tailor taxation rules to your individual use case and ensure you are complying with all relevant laws.
Note
Using custom tax rules is mutually exclusive with the EU reverse charge option. If you have defined one or more custom tax rules, then the EU reverse charge taxation rule will not apply, even if the box next to "Use EU reverse charge taxation rules" is checked.
"Reverse charge" is a rule in European Union VAT legislation that specifies how to calculate taxes if the seller and buyer of a good reside in different EU countries. If the buyer is registered as a VAT-paying business in their country, you charge them only the net price without taxes and state that the buyer is responsible for paying the appropriate taxes.
If you want to use reverse charge, you have to ask your customers for their VAT ID. Navigate to navigation pathYour event then Settings then Invoicing. Switch to the Address form tab and ensure that the boxes next to "Ask for invoice address" and "Ask for VAT ID" are checked. Click the Save button to confirm.
If you want to enable reverse charge, navigate to navigation pathYour event then Settings then Tax rules. Select the tax rule for which you want to enable reverse charge and switch to the Advanced tab. Check the box next to "Use EU reverse charge taxation rules" and select your country from the "Merchant country" dropdown menu.
If you enable the reverse charge feature and specify your merchant country, then pretix will perform the following process whenever a customer places an order:
- The shop presents the customer with net or gross prices as configured for the applicable tax rule (on the General tab).
- The customer adds a product to their cart. The shop displays gross prices including taxes.
- In the "Your information" step, the customer can enter their "Invoice information". If the invoice address is in a non-EU country, then pretix will remove the tax from the price. If the invoice address is a business address in an EU country other than the merchant country and has a valid VAT ID, then pretix will remove the tax from the price and add a reverse charge note to the invoice.
pretix validates VAT IDs against the EU validation web service when the customer clicks the "Continue" button. If the service is unavailable at that moment, then the customer has to pay VAT tax and reclaim the taxes with their government at a later point.
If your and your buyer's EU countries use different currencies, the invoice will include the total and VAT amount in both your event's currency and the local currency of the buyer.
For existing orders, a change of the invoice address will not result in an automatic change of taxes. In order to trigger such a change manually, navigate to navigation pathYour event then Orders then All orders and click one of the orders in question. Click the Check button next to the VAT ID. Then, click the Change products button. Under the "Other operations" heading, select one of the options next to "Recalculate taxes". Confirm your choices by clicking the Perform changes button.
Note
Modifying tax status back and forth may introduce rounding errors of up to one cent from the intended price. This is unavoidable due to the flexible manner of price calculation.
Assigning tax rules#
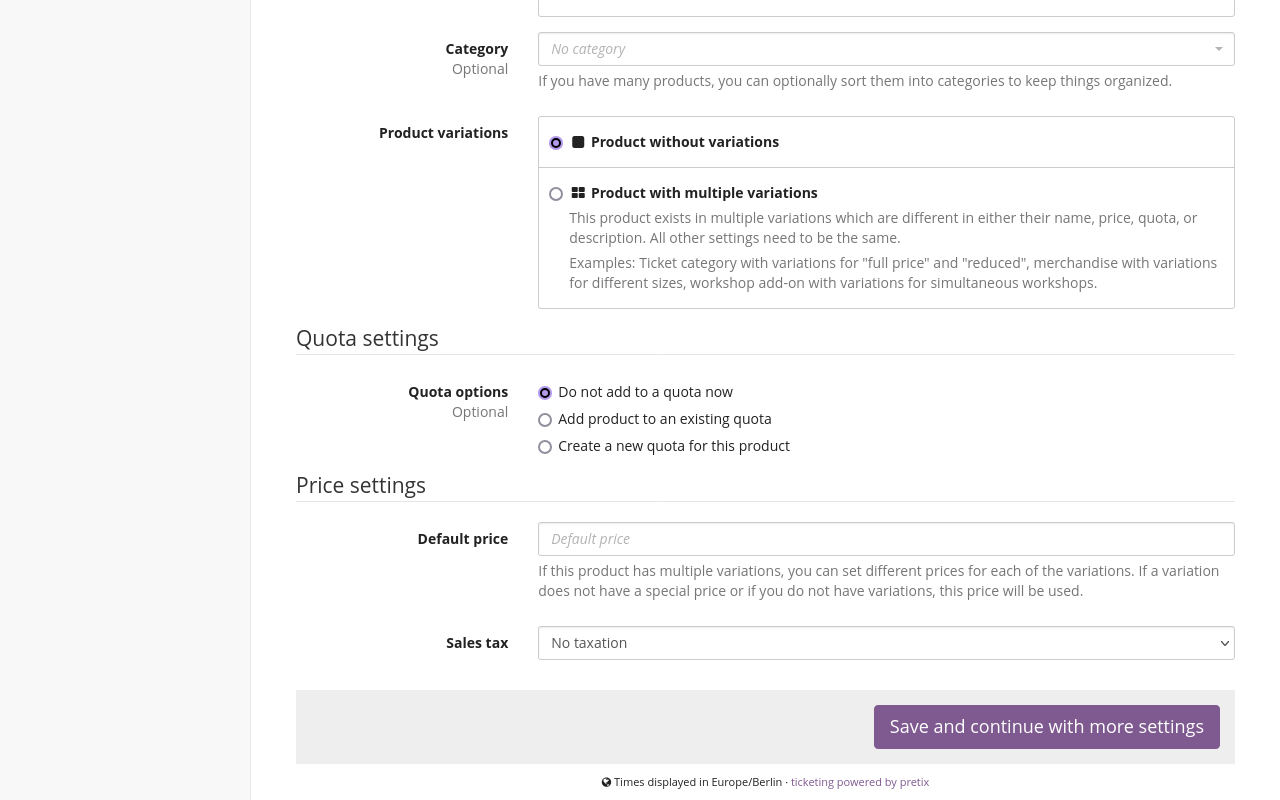
If you want to assign a tax rule to a new product you are creating, navigate to navigation pathYour event then Products then Products. Click the Create a new product button. Under the "Price settings" subheading, click on the "Sales tax" drop-down menu and select the tax rule that you want to assign to the product. This list will display the internal name you specified on the tax rules settings page and the specified percentage. Once you have made your selection, click the Save and continue with more settings button.
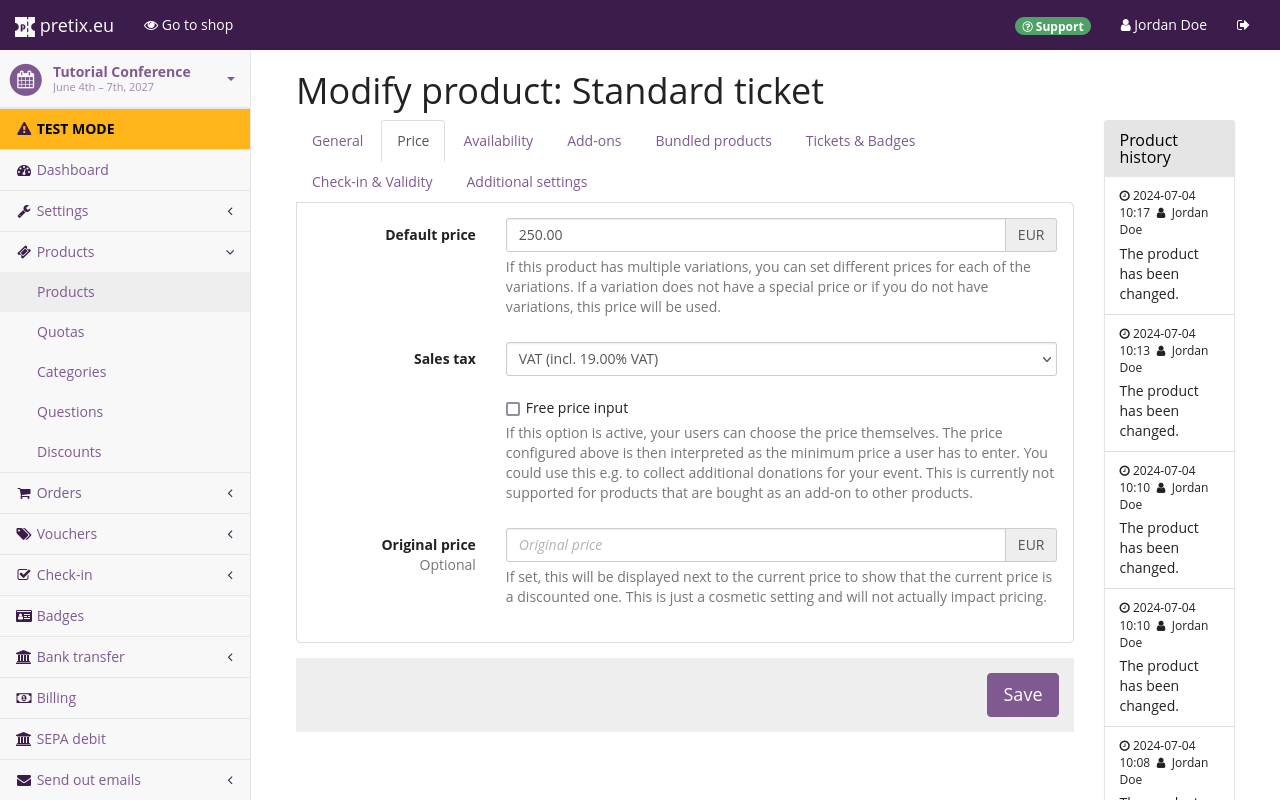
If you want to assign a tax rule to an existing product, navigate to navigation pathYour event then Products then Products. Click the edit button next to the product in question and switch to the Price tab. In the "Sales tax" drop-down menu, select the tax rule that you want to assign to the product. This list will display the internal name you specified on the tax rules settings page and the specified percentage. Once you have made your selection, click the Save button.
Mixed taxation (tax included in price)#
Warning
The pretix Documentation is not legal or financial advice. Please consult a tax advisor before setting the tax rules for your shop. We do not assume any liability for the correct handling of taxes in your ticket shop.
This section explains how to implement a mixed tax situation for a single product. pretix allows you to do this by creating a product with the full price and one tax rate, and then bundling products with different tax rates into that first product.
Note
This section assumes your shop works with tax included in the product price. Check the box next to "The configured product prices include the tax amount" on all of your tax rules. If you have unchecked this box on all of your tax rules, refer to the section Mixed taxation (tax added on top of price).
Create a new product. Give it a descriptive name and assign one of the relevant tax rates. Which of the tax rates you assign is irrelevant. Assign this product the total price of the combination of differently taxed products. This price represents the full price of the bundle. Neither the prices of the other bundled products nor the "Designated price part" setting have an influence on the total price of the combination.
Create another new product. Assign it a different tax rate. The price you assign to this product is irrelevant. Switch to the Availability tab, check the box next to "Only sell this product as part of a bundle" and click the Save button. If you need more than two different tax rates in a single bundle, repeat this step for every additional tax rate.
Edit the ticket with the full price, switch to the Bundled products tab and click the Add a new bundled product button. Choose one of the other products you created under "Bundled product" and set the "Designated price part". The "Designated price part" determines how much of the bundle's full price is taxed at the rate assigned to the product. pretix assumes that the "Designated price part" for bundled products already includes tax.
Repeat this step for each product with a diverging tax rate that you want to include in this bundle. Then, click the Save button.
For illustrative purposes, assume you are organizing an educational event for a charitable organization in Germany and you have permission to charge a reduced tax rate of 7.00% for that event. However, the admission ticket price also automatically includes catering, which is still taxed at a rate of 19.00%. The tax situation may look something like this:
- event ticket price: €450 gross total (including €150 for food)
- including €19.63 VAT at 7.00%
- including €23.95 VAT at 19.00%
If you want to depict this tax situation using the method described above, create the following two products:
- "Event ticket" with a price of €450 and a tax rate of 7.00%
- "Catering" with a price of €150, a 19.00% tax rule and the box “Only sell this product as part of a bundle" checked
Then, select the "Event ticket" and open the Bundled products tab. Add the "Catering" product and enter a "Designated price part" of €150.
When a customer purchases the event ticket, the catering will be added as a bundled product automatically. The product price of €450 will be split into the two components. €300 will be taxed at 7.00% and €150 will be taxed at 19.00%.
Mixed taxation (tax added on top of price)#
This section explains how to implement mixed taxation if your pretix shop uses tax rules that add tax on top of the displayed price of the products. Follow the instructions under Mixed taxation (tax included in price) in everything except pricing. If the boxes next to "The configured product prices include the tax amount" are unchecked on all of your tax rules, then configuring prices for mixed taxation is more complex.
pretix assumes that the "Designated price part" for bundled products already includes tax. Thus, you need to calculate price after tax for bundled products yourself.
Multiply the intended price before tax with the applying tax rate. Add the result to the intended price before tax. Edit the product into which you are bundling the other products. Switch to the Bundled products tab. Enter the number you calculated (net price + tax) into the field "Designated price part".
Repeat these steps for every product you are adding to the bundle. Add all amounts you entered in the "Designated price part" fields to the price before tax of the base ticket. Then, switch to the Price tab and enter the sum of those amounts in the "Default price" field.
Selecting the tax computation algorithm#
pretix offers three different algorithms for calculating taxes. Your choice of algorithm depends on several factors:
- whether you are using e-invoicing compliant with EN 16931
- whether you are primarily selling to business costumers or private individuals
- the rounding method used by any external system you may be using for tax reporting
In order to select the tax rounding algorithm you want pretix to use, navigate to navigation pathYour event then Settings then Taxes. Under "Tax settings", this page displays a setting called "Rounding of taxes".
The default selection is "Compute taxes for every line individually". Use this option if you want pretix to compute taxes for each position individually. pretix will sell each product with the exact net and gross price configured by you. The net total of an order including several positions will have no impact on the tax computation. We recommend using this option if you are not using e-invoicing of any kind.
The second option is "Compute taxes based on net total". Use this option if you want pretix to compute taxes using the net total of an order. pretix will add the net prices of all positions of an order together and use the resulting net total to compute the amount of tax.
This algorithm is our implementation of EN 16931. We recommend using this option if you are using e-invoicing and most of your customers are businesses. The disadvantage of this method is that customers may encounter unexpected changes in the gross total price of an order while they are using your shop.
The third option is "Compute taxes based on net total with stable gross prices". Use this option if you want pretix to calculate taxes by making minimal changes to net prices of individual positions in order to arrive at the expected gross total.
This algorithm is also compatible with EN 16931. We recommend using this option if you are using e-invoicing and most of your customers are private individuals. The advantage is that customers do not encounter unexpected changes to the gross total price of an order while they are using your shop.
The disadvantage of this method is that it can introduce miniscule variations in the net prices paid on individual order positions. Thus, you may end up selling the same product at different net prices. The gross prices and tax rates will always remain the same.
If you use an external system for tax reporting, you should select the method that matches the one used by that external system. This prevents inconsistencies in rounding between pretix and the external system.
For more information on tax computation algorithms, see our developer documentation's section on Rounding of taxes.
Troubleshooting#
Appropriate tax rule does not appear in the drop-down menu#
If you are trying to assign a tax rate to a product, but the "Sales tax" drop-down menu does not display the appropriate tax rate, then you have to create that tax rate first. Follow the instructions in the section Creating tax rules to create a tax rule with the name and rate that you need. After you have done that, edit your product. The tax rate will now appear in the "Sales tax" drop-down menu and you will be able to assign it.
International business customer places order without VAT ID#
If an international business customer places an order without giving you their VAT ID, you can manually edit the order in question. On the "Order details" page, click Change answers. Under "Invoice information", select "Business or institutional customer". The page will now display a "VAT ID" field where you can enter the customer's VAT ID.
