Übersetzungshinweis
Leider war es uns noch nicht möglich, diese Seite für Sie auf Deutsch zu übersetzen. Wir zeigen daher stattdessen die englischsprachige Version der Seite und bitten um Verständnis.
Payment#
We do not just want to offer tickets in our shop; we also want to get paid for them. That is what we will take care of in this part of the tutorial. We are going to take the following steps:
- enabling payment via credit card using Stripe
- enabling payment via bank transfer
- setting up invoices to be sent automatically with every order
Setting up payment providers#
pretix takes care of payment via a wide selection of payment providers. For our conference, we are planning to receive payments by credit card through the payment provider Stripe and by bank transfer. The prerequisites for this are an active Stripe merchant account and a bank account.
pretix will automatically log payments coming in through most payment providers, including Stripe. An order in our shop is marked as paid as soon as Stripe records a corresponding payment. Bank transfers are the exception to that rule because the pretix software would need to monitor payments arriving at our bank account.
On pretix Hosted, it is possible to set up a connection to our bank account. On all versions of pretix, payments via bank transfer can be monitored either by manually approving them as they come in, or by regularly importing digital bank statements.
In order to set up payment providers, we will navigate to our personal dashboard by clicking pretix.eu in the top left corner of the website. We will then select our event in the list of "Your upcoming events", open Settings in the sidebar and click the Payment subentry. This page displays a list of payment providers. Bank transfer and Stripe should be included in this list. By default, all payment providers in this list except gift card will be disabled.
Hinweis
If the payment providers you want to use are not being displayed in this list, that means the corresponding plugin is not enabled. In order to activate such a plugin, you have to navigate to NavigationspfadYour event dann Settings dann Plugins and open the Payment providers tab. Click the Enable button next to the plugin you want to use. You can tell that a plugin has been activated by green " Active" tag.
Stripe#
We will first enable Stripe by clicking the Settings button next to it. This takes us to the payment settings page for Stripe, which currently only contains a Connect with Stripe button.
Clicking that button takes us to a dialog on stripe.com, where we will input our email address and go through the process of connecting our Stripe merchant account to our pretix account.
We will then return to pretix.eu, navigate to our event, open Settings in the sidebar, click the Payment subentry and open the Stripe settings. Instead of the single button, the page will now display a multitude of settings.
We will check the boxes next to "Credit card payments" and "Enable payment method", then scroll to the bottom and click the Save button. Credit card payments via Stripe are now available as a payment method for customers in our shop.
Bank transfers#
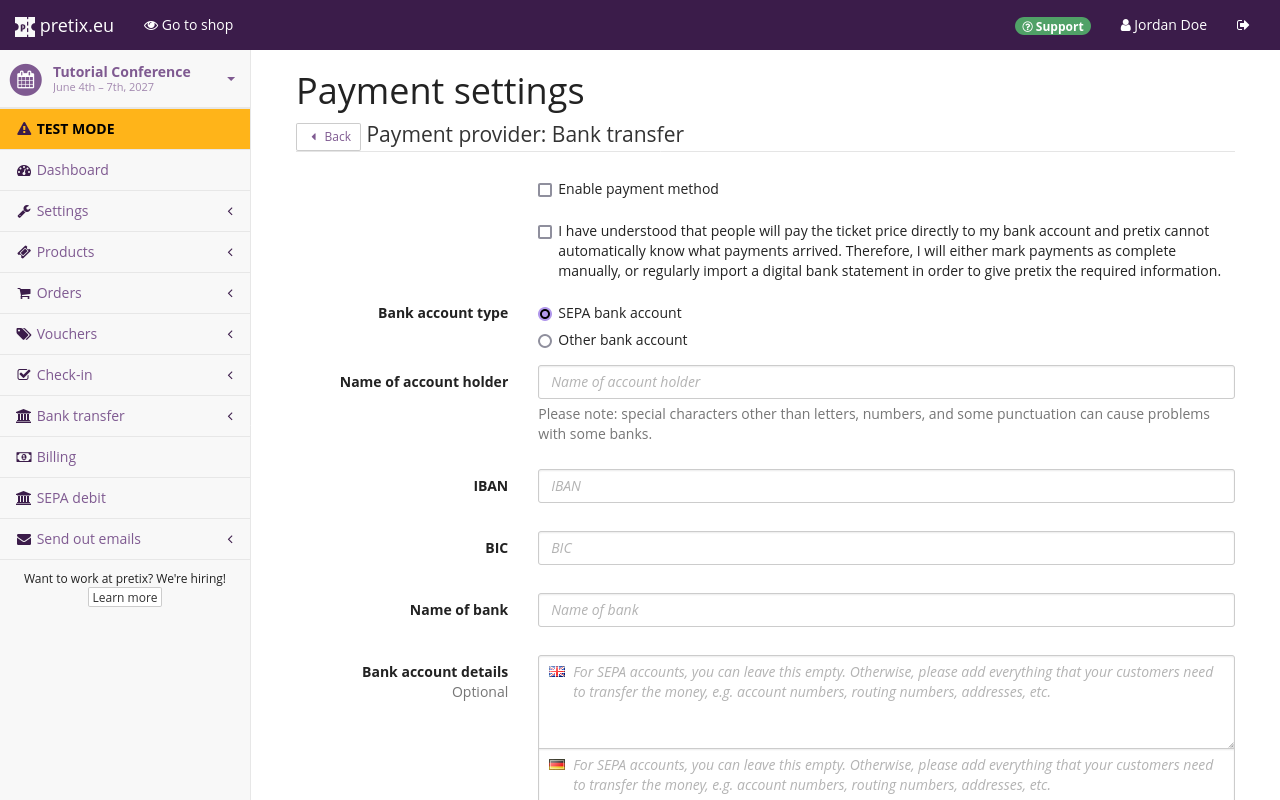
We will also enable bank transfers by navigating back to the payment page for our event NavigationspfadEvent dann Settings dann Payment and opening the bank transfer settings. We are going to choose "SEPA bank account" as our "Bank account type". We will provide our bank account info, i.e. the name of the account holder, IBAN, BIC and the name of the bank in the fields labeled as such.
We will then check the box to confirm that we have understood the special conditions that apply to bank transfers as a payment provider in pretix and the box next to "Enable payment method". Then, we will click the Save button and return to the payment settings. Bank transfer, gift card, and Stripe should all have a green " Enabled" tag next to them now.
Hinweis
By default, the pretix software is not able to monitor payments arriving at your bank account. On pretix Hosted, you can set up automated bank imports. On pretix Community and pretix Enterprise, you have to notify the pretix software of incoming payments—either by manually approving payments as complete, or by regularly importing digital bank statements. Read our guide on monitoring incoming payments before using bank transfer as a payment method in your shop.
For more information on using bank transfers, see bank transfers.
Setting up invoices#
We will navigate to the invoicing settings by going to our event, opening Settings in the sidebar and clicking the Invoicing subentry. On the Invoice generation tab, we will set the "Generate invoices" option to "Automatically after payment or when required by payment method."
We will then switch to the Issuer details tab and provide the name and full address of our organization. The data we enter here will be used for all invoices we generate from this point on.
If we now click the Save and show preview button, our browser is going to download a PDF preview of the invoice with our organization's address, the invoice number TUTCON27-PREVIEW and an example listing of purchases with a partially received payment.
Conclusion#
Now that we have given our customers two options for making payments in our shop and set up the automatic dispatching of invoices, we can move on to testing our shop before finally taking it live.


